
TC DnB Academy
A free, complete guide to making drum and bass — from your first beat to mixdowns, mastering and getting your music to DJs.
Last updated 29/5/2025
Hello! Welcome to the TC DnB Academy!
This is a free resource on how to make drum and bass, created on the 6th of January 2024 during my down time.
The idea behind it is to have a complete guide to starting out making drum and bass music. I want to spread the knowledge I have gained over my years of spinning round the sun making tunes.
I receive many DMs on a weekly basis from people asking me questions on how to get started making DnB, and about the technical aspects of DnB production techniques. In order for me to not have to write the same DM over and over and over again, I came up with the idea of putting all my knowledge in one place for everyone to share. I really hope that the information contained within helps you in your journey as a DnB producer.
Whether you are planning to become the next big thing or just making tunes to play to your mates, I wish you the very best!
How do I get started making DnB?
I get a lot of questions about how to start making music and about production techniques, from complete beginners to more advanced producers. This page is here to help you achieve some progress in your musical journey, or simply to inspire you to get into DnB production.
What equipment do I need to get started?
To get started making DnB or electronic music in general, you are going to need a few bits of equipment. The essentials:
- The most powerful computer you can afford (a lot of music people use Apple Macs but it's not essential)
- A decent sound card (this is the window to the sound — the headphone output is not good enough)
- A good pair of headphones or powered studio monitors (speakers)
- Some software (a DAW — Digital Audio Workstation)
All the DAWs I recommend for DnB
- Ableton Live: https://www.ableton.com
- FL Studio: https://www.image-line.com
- Logic Pro (Apple — you will need a Mac): https://www.apple.com/logic-pro/
- Cubase (Steinberg): https://new.steinberg.net/cubase/
- Reaper: https://www.reaper.fm
- Reason (Reason Studios): https://www.reasonstudios.com
- Studio One (PreSonus): https://www.presonus.com/products/Studio-One
- Bitwig Studio: https://www.bitwig.com
All the DAWs have their pros and cons. A lot of the new school producers at the moment are using FL Studio or Ableton. I have recently been looking at Bitwig, but I think Logic is and always will be my DAW of choice.
The main thing is to get one and learn it inside and out — every function and feature. If you are serious about learning how to make DnB, you will have to do quite a lot of research into how to achieve the sound you are looking for.
What are plugins?
Now that you have your DAW and have started making tunes with the built-in functions and features, you might find that you want to expand the functionality of the software. This is where plugins come in. Other software companies make plugins for DAWs in various formats (VST, AU). These plugins can be instruments or effects. Most plugins will work with all the DAWs, and there are literally hundreds of companies and thousands of plugins out there for music making. They range from free to very expensive, and it is going to be a learning curve to get to know which plugins you might want to use for your DnB music making.
Plugins I recommend for DnB
I have used all these plugins and can attest to their usability and value for money. For the ones that cost money, wait for a sale!
Synths:
- Vital Synth (free): https://vital.audio/
- Surge (free): https://surge-synthesizer.github.io/
- Serum (paid): https://xferrecords.com/products/serum/
- FM8 (paid): https://www.native-instruments.com/en/products/komplete/synths/fm8/
- Massive (paid): https://www.native-instruments.com/en/products/komplete/synths/massive/
- ANA 2 (paid): https://www.sonicacademy.com/products/ana-2
- Kontakt sampler (paid): https://www.native-instruments.com/en/products/komplete/samplers/kontakt-7/
- Phase Plant (paid): https://kilohearts.com/products/phase_plant
Effects:
- Analog Obsession plugins (free): https://analogobsession.com/
- Airwindows plugins (free): https://www.airwindows.com/
- Valhalla Supermassive reverb (free): https://valhalladsp.com/shop/reverb/valhalla-supermassive/
- Crave EQ2 (paid): https://cravedsp.com/crave-eq
- FabFilter plugins (paid): https://www.fabfilter.com/
- Melda plugins (free/paid): https://www.meldaproduction.com/effects/free
- Kilohearts free bundle: https://kilohearts.com/products/kilohearts_essentials
Love the process
Making DnB is going to be frustrating at times but also very rewarding. Even if you are just making tunes to show your friends, loving the process of learning and pushing the sound will be key to making good tunes. Have fun with it! Some of my best tunes came from just messing around on a funny or stupid idea that I never thought would turn into anything.
Frequently Asked Questions
Where do I get sounds and samples for DnB?
Finding good sounds for your productions can be quite a challenge. Building your sound library will be a big part of your DnB making journey. There are lots of options for buying samples and patches for software plugins, however I would recommend that you take time to find the best sounds, and don't underestimate the power of recording your own samples and sounds and making your own patches.
For DnB, originality is definitely going to give you an edge in the market, and using sounds from sample packs and patch packs without making them your own will not help you to stand out and be original.
I can not emphasise enough the importance of making a large, diverse sound library for your productions. I make a folder for every year for all the sounds I make in that year. It will make all the difference when it comes to being able to consistently bang out big tunes that all sound different.
Is it OK to copy other artists' tunes and ideas?
When you are starting out in DnB production I think it's fine to copy other artists' ideas, as long as you keep the tunes as personal dubplates and do not release them. As a way of learning, copying is very effective and will help you to develop your own style in the long run. It is crucial, though, when you have got the skills to make tunes, that you define your own style and brand in your music.
Should I release all my tunes?
In this day and age of SoundCloud and instant gratification there is a tendency for producers to chuck out everything they make into the public domain. This is good for building leverage and followers, but I think as a producer just starting out it is a good idea to at least define your sound before you put out all your tunes. I think I have made the mistake of possibly putting out tunes that were not quite right, and have regretted it.
Where should I get my influences?
In my humble opinion, the best producers I know don't get their influences from other DnB producers — maybe they look back to old music. I think the more you are influenced from within the scene, the more of an echo chamber it becomes. Our goal has got to be to push the music forwards as much as we can.
Do my tunes need to be DJ friendly?
Given that DnB is mainly a type of dance music with roots in Jamaican dancehall / jungle techno culture, I would say it is a good idea to have DJs in mind when making tunes. A lot of people get into production from the DJ side, and making tunes you would want to play in your set is a key consideration. Saying that, there is art for art's sake and you don't have to be constrained by rules. Going against the DJ-friendly grain might have implications on how much play you get — and it is an amazing feeling seeing thousands of people dance to your tune.
Do I need to know music theory to make DnB?
I think no, but it helps to know a little bit. Some people have a natural ability to be musical, and I would say if you are one of these people then you might not need to know about the theoretical aspects of music. But if you are not able to sit down at a piano with no training and at least play a tune or two, it might be worth getting some musical training to start off on the journey. I would also say this: knowing too much can be a negative in music. When you know too much you might not explore ideas because you are aware that they might have been done before, and I believe that you should be able to do things in your way, with your style, and not be held back by the knowledge of others having been down the same roads. So definitely learn some basics, but also feel your way through it, cause it's art at the end of the day and should not have rules or constraints.
Making a DnB Drum Beat
So you have your computer, sound card, headphones/speakers and DAW, and now you are wondering how to make a simple drum beat to get started. Here is a short guide to making a beat.
Set the tempo (speed of your tune)
Every DAW will have a tempo setting, usually in the top bar of the program. DnB has quite a specific range of tempos. The most common tempo used by most drum and bass producers is 174BPM — one hundred and seventy four beats per minute — but this is not a hard and fast rule. For the longest time I used 173BPM. A lot of jump up producers use 175, and neurofunk producers quite often use 172BPM. A lot of older jungle tunes range from 165BPM to 170BPM. Your choice of tempo is subjective and stylistic. Mostly, to be current, you are going to want to be at 174.
Find some drum samples
To make a simple drum beat you will need a kick drum, snare drum and hat sample.
Example drums here: TCDNB_Example_Drums.zip
Making the beat
There are 2 ways to make a beat in most DAWs (in the case of the images below it is Ableton Live):
- By placing the different sounds onto audio tracks in the right places to sequence the beat.
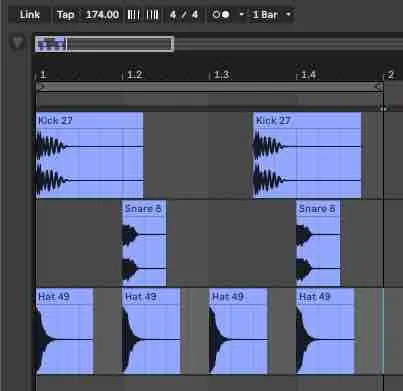
- By putting the sounds into a sampler and triggering the sounds using the piano roll.


There are advantages and disadvantages to both methods. With method 2 you are able to pitch the whole beat up and down using real-time controllers, and save the whole beat as a preset for use later and in other projects.
The images above show the simplest placement of the beats to make a simple DnB drum beat.
Software Synths
The history of software synths
Back in the day we (producers) would use all hardware to make electronic music. It was expensive and very complex, using all the different operating systems for the samplers and synths and sequencing them all with MIDI. I remember getting Logic 5 for the first time, with the ability to use audio and plugins.
The first Virtual Studio Technology (VST) plugin became available in 1996. It was introduced by the German company Steinberg with the release of Cubase 3.02. VSTs revolutionised the music production industry by allowing developers to create a wide variety of audio effects and virtual instruments that could be used within digital audio workstations (DAWs). This innovation greatly expanded the creative possibilities for producers and musicians, enabling them to integrate sophisticated software-based audio processing and synthesis into their workflows. By the early to mid-2000s, VST had become a widely supported standard in the industry.
What is MIDI?
MIDI, which stands for Musical Instrument Digital Interface, is a technical standard that allows musical instruments, computers and other electronic equipment to communicate and synchronise with each other. Introduced in 1983, MIDI revolutionised music production and performance by enabling devices to send and receive various types of information. Here are some key aspects of MIDI:
- Digital protocol: MIDI is a digital protocol, which means it uses a specific set of instructions to communicate information. It does not transmit audio; instead, it sends data about how music is played, such as the notes, timing, velocity (how hard a note is played) and other control signals.
- Messages: MIDI messages are the instructions sent between devices. These include note-on (when a note is played), note-off (when a note is released), control change (like modulating a sound), program change (changing the instrument sound) and more. These messages enable precise control over musical performance.
- Channels: MIDI can transmit data on 16 separate channels. This allows a single MIDI device or interface to control up to 16 different instruments simultaneously.
- Connectivity: Originally, MIDI devices were connected using 5-pin DIN cables. Modern MIDI devices can also connect via USB, and there are even wireless MIDI solutions.
- Applications in music: Musicians use MIDI keyboards to play virtual instruments on their computers, drum machines to send rhythm patterns, and MIDI controllers to manipulate software parameters in real time.
- Sequencing and composition: MIDI is crucial in music production for sequencing — the process of creating and arranging a series of MIDI messages to form a musical composition. This can be done in a DAW.
- Synchronisation: MIDI also allows devices to synchronise with each other, ensuring that they operate in time with one another. This is vital in both live performances and studio settings.
- Evolution: Over the years MIDI has evolved. MIDI 2.0, the latest version, offers enhanced features like increased resolution for controller messages, more nuanced expression capabilities, and improved compatibility and communication between devices.
MIDI has been an essential tool for musicians, producers and composers, providing a flexible and efficient way to create and manipulate music digitally.
What soft synths do I need?
Starting out, your DAW should include a few software synths to play with. It should be enough to at least get you started with making some bass sounds and the other things you need for your music.
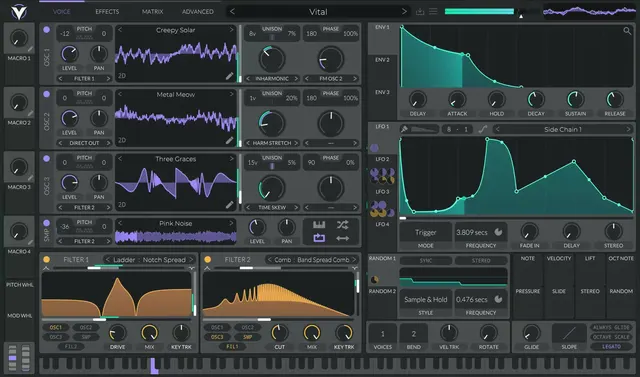
After some time you might find that you need more advanced features, and luckily they can be obtained for free in these times with Vital, a free synth available to all.
What are the basic concepts of synthesis?
Synthesis is the process of creating sound electronically. It's a foundational concept in electronic music and sound design, used in various contexts from music production to sound effects in gaming and film. There are several types of synthesis, each with its own method of generating and manipulating sound. Here are some of the most common ones:
- Subtractive synthesis: One of the most basic and widely used synthesis methods. It starts with a rich, harmonically complex sound wave (like a square, sawtooth or triangle wave) and then "subtracts" frequencies using a filter. By cutting out certain frequencies, it shapes and modifies the sound. The Moog synthesiser is a classic example of subtractive synthesis.
- Additive synthesis: The opposite of subtractive synthesis, additive synthesis works by adding together individual sine waves with varying frequencies, amplitudes and phases to create a more complex sound. It's like building a sound from the ground up. This method can precisely control the timbre but can be computationally intensive.
- FM (frequency modulation) synthesis: FM synthesis uses one waveform (the modulator) to change the frequency of another waveform (the carrier), creating complex harmonic profiles. It's known for its ability to produce a wide range of sounds, from naturalistic instruments to electronic tones. The Yamaha DX7 is a famous FM synthesiser.
- Wavetable synthesis: This method uses a table of waveforms which can be scanned or morphed through to create sound. It allows for rich, evolving textures and is commonly used in modern digital synthesisers.
- Granular synthesis: Granular synthesis breaks sounds down into tiny "grains" (small snippets of sound) and then recombines and manipulates these grains in various ways to create new textures. It's great for creating atmospheric, ambient and highly textured sounds.
- Physical modelling synthesis: This method uses mathematical models to simulate the physical properties of real instruments (like the tension of a string or the shape of a trumpet bell). By adjusting parameters you can recreate realistic-sounding instruments or completely new sounds.
- Sample-based synthesis: Rather than generating sounds from oscillators or mathematical algorithms, this method uses recorded audio samples. These samples can be played back at different pitches and manipulated in various ways to create musical sounds.
Each synthesis method has its own characteristics and is chosen based on the desired sound and application. Synths, whether hardware or software, often combine multiple synthesis methods to offer a broad range of sonic possibilities.
But how do I actually make big sounds for my tunes?
Here is the thing. There really is no way of just magically getting incredible sounds. Every snake-oil sound-selling company is going to try and sell you on the dream that if you only part with your hard-earned cash you will magically be Nick from Noisia, but it simply is just a matter of getting a synth and sitting down and working with it for many hundreds of hours until you kinda get what each control is going to do to a sound, and making it happen.
Some preset companies are better than others though — Preset Food for instance (OK, here is the shill for my preset and sample company). Preset Food has a bunch of packs that are not expensive — £4.20 per pack mostly — and I give you sounds you can actually use, and they are good. OK, shilling over. I will mention it one time; if you missed it, that's your problem.
There are some incredible YouTube resources out there for sound design. I tend to avoid watching the ones that say "sound like this artist" or "that artist". It's just clickbait, and half the time it's not as good as the original sound — and I guess that's my point. It's your sound. Make your sound, even if it's shit at first. At least it's yours and original.
Older soft synths could sound better than new
Recently I have been going back in on some older soft synths like FM8 and Massive. I even saw a video of Bou in the studio using NI Massive for his main bass sound, and it made me think. It's not just my ears or speakers or very expensive sound card. I can hear a difference between the older synths and newer, more popular ones. Perhaps it's the algorithms that go into the generation of the wavetables; perhaps it's just that the plugins were not just shat out in a week by a coder using the JUCE framework. I know if you're a beginner most of what I just said will be complete gobbledygook, but trust me — some old synths have a thing, even in the software world.
EQ or Equalisation
Personal thoughts on EQ
Personally I think that EQ could be the most significant tool in your arsenal when it comes to making DnB. Being able to control the balance of sounds in terms of a mix, and then overall on the master channel, is key to getting that edge. I would definitely have an EQ on every channel doing one thing or another. The more experience you get with EQ, the more you are going to know what is going on — how much to boost or cut at what frequencies.
There are no hard and fast rules to EQ of a particular sound source, as every sound is different. This is where feel and experience come into the mix. An EQ is like any instrument: you have to learn it and practise its use in order to be good at it.
To learn a particular EQ, I will load up a pink noise source, chuck on the EQ I want to learn, and just listen to the changes and look at the changes on a spectrum analyser.
Babies cry at 3.5kHz
As humans we have evolved to be able to hear our babies when they are in distress. You are saying, what the hell does this have to do with EQ? It means your ears have evolved to be more sensitive to particular ranges of frequencies. I'm not saying that you should just add 3.5k to every sound for attention — it would soon become very fatiguing and painful to the ears. But knowing the ears, and the reasons why they might have sensitivities in some ranges, could have some benefit to the choices you make when it comes to EQ.
Highs and lows are addictive, and everything is relative
Ears are essentially measurement devices. The thing they measure is the difference between one state and another. As you are making a tune there is a tendency to want to make tunes brighter and brighter, with more and more bass as you go on, because your ears become used to the sounds and you need more of that top end and bottom end hit to the brain. This is the devil's work, because true power and loudness is in the impact of the mid range, centred around 1kHz.
History of EQ
The history of the equaliser (EQ)) is a fascinating journey through the evolution of sound technology. Here's a brief overview:
- Early 20th century — telephone networks: The origins of EQ technology can be traced back to the development of telephone networks. Engineers needed to adjust (equalise) the frequency response of long telephone cables to ensure clear transmission of voices. This was the birth of the concept of "equalisation".
- 1930s — film industry adaptation: The concept of EQ began to find its way into other fields, such as the film industry. The first graphic equalisers were developed to fine-tune the audio for film soundtracks. They were bulky, mechanical devices using large slide controls to adjust different frequency bands.
- 1950s — recording studios: Equalisation technology progressed significantly in the 1950s as it became integral to the recording process. Recording studios started using passive EQ units with fixed frequency bands, primarily to compensate for deficiencies in recording equipment and environments.
- 1960s and 1970s — the advent of active EQs: The development of active EQs (using amplifier circuits) marked a major leap. This era saw the introduction of semi-parametric and parametric equalisers, offering more control over frequency, bandwidth and gain. These advancements revolutionised studio recording, live sound reinforcement and home audio.
- 1980s — the digital revolution: With the advent of digital technology, EQs underwent another significant transformation. Digital equalisers provided unprecedented precision and flexibility, allowing for complex EQ curves and real-time adjustments.
- 21st century — software EQs: The proliferation of computer-based audio production led to sophisticated software EQs. These digital EQs, available as plugins in audio editing and mixing software, offer a wide range of features, from emulating classic analogue EQ units to advanced spectral manipulation.
Throughout its history, the EQ has evolved from a tool for basic sound correction to a sophisticated device for creative sound shaping. Today EQs are an indispensable tool in audio production, with applications ranging from live sound and studio recording to broadcasting and home audio systems.
EQ plugins and stock EQs
So you have got yourself a synth plugin working, and now you want to change the sound of the synth by making it brighter or adding more bass. An EQ plugin is what you need. Every DAW is going to have what we call stock plugins — plugins that come with your DAW as part of the package. The stock plugins that come with DAWs are actually very good, and most of the time they are going to function as you need for simple EQ tasks. Also, in many cases they will be optimised to use less CPU (processor power), giving you the ability to have more tracks with EQ.
EQ types
Within any EQ plugin there are going to be many options that are the same across all the DAWs and third-party plugins.
Bell EQ (or peaking filter): A bell EQ boosts or cuts a range of frequencies around a central "target" frequency, creating a bell-shaped curve on an equaliser graph. This type of EQ is very versatile and commonly used for general tone shaping in music production and mixing. It typically has three main adjustable parameters:
- Centre frequency: the frequency around which the boost or cut is applied.
- Gain: how much the selected frequency range is boosted or attenuated.
- Bandwidth (or Q): how wide or narrow the range of affected frequencies is around the centre frequency. A high Q value means a narrower band (affecting fewer frequencies around the centre point), while a low Q value means a wider band.
High pass filter (HPF): A high pass filter allows frequencies above a certain cutoff point to pass through and attenuates (reduces) frequencies below that point. It's like a filter that "lets the highs pass". This is commonly used to eliminate low-frequency noise or rumble in recordings, such as handling noise or wind noise. For example, setting a high pass filter at 80Hz means that most of the frequencies below 80Hz will be significantly reduced, while those above 80Hz will remain unaffected.
Low pass filter (LPF): A low pass filter does the opposite. It allows frequencies below a certain point to pass through and attenuates frequencies above that point. This type of filter "lets the lows pass" and is often used to remove high-frequency noise or to make a sound appear more distant or muffled. For instance, setting a low pass filter at 5kHz means that frequencies above 5kHz will be reduced, making the sound warmer or less sharp.
Shelf EQ: A shelf equaliser boosts or attenuates all frequencies above or below a certain point. There are two types:
- High shelf: boosts or cuts frequencies above a certain threshold. For example, if set at 8kHz, all frequencies above 8kHz will be increased or decreased by the same amount.
- Low shelf: the opposite of the high shelf — it affects frequencies below a chosen threshold.
What is phase in audio processing?
In audio, "phase" refers to the timing of a sound wave's cycle. When two sound waves are in phase, their cycles match up perfectly and they reinforce each other. When they are out of phase, they can partially or completely cancel each other out. This is critical in audio processing because changes in phase can affect the tone and clarity of the audio.
When using an EQ, phase shift can occur. This means that the EQ process doesn't just change the amplitude of various frequencies — it can also alter their timing relative to each other. This shift can sometimes cause unwanted artefacts in the sound, especially when multiple overlapping frequencies are adjusted.
1. Natural phase EQs are designed to minimise the phase shift caused by equalisation. They are often analogue or analogue-modelled digital EQs. They adjust the phase of the signal in a way that's more natural and analogous to how sound behaves in the physical world — the phase shift they introduce is proportional and harmonious with the adjustments made to the frequency spectrum. They are useful where maintaining the natural tone and character of the original sound is crucial, such as in mastering or when working with acoustic recordings.
2. Linear phase EQs are a type of digital EQ that avoids phase shift altogether. They maintain the phase relationships between frequencies, regardless of how the EQ alters their amplitude. They use complex algorithms to ensure that all frequencies are delayed by the same amount, preserving the original phase relationships — this is achieved by applying an equal amount of latency to all frequencies. They are ideal where phase coherence is paramount, like EQing individual tracks within a mix to avoid phase cancellation, and especially useful in mastering and wherever transparency is key.
Considerations: Natural phase EQs are often favoured for their musical and natural-sounding results — great for tasks where the character and warmth of the sound are important. Linear phase EQs are chosen for their precision and transparency, especially in detailed mastering work or when dealing with complex mixes. However, they can introduce pre-ringing artefacts and require more computational power.
In summary, the choice between natural phase and linear phase EQs depends on the specific requirements of the audio material and the desired outcome of the equalisation process.
Detailed reading: https://en.wikipedia.org/wiki/Equalization_(audio)
Learning the Frequencies
How can I learn frequencies?
There are several ways to learn your frequencies. My favourite is to load up a spectrum analyser and look at individual samples. This will give you an idea of what is going on in each sound in a mix.
Human hearing ranges from 20Hz (20 cycles per second) to 20,000Hz (20,000 cycles per second).
Snare drums
A snare drum is essentially 2 diaphragms strung on each side of a tube, which produces a bongo-drum-style thud ranging from 150Hz to 300Hz in the low mid to bass range, plus a string of wire beads — the thing the snare is named after — that gives it the high end snap sound. Knowing this gives you insight into what you are going to see on a spectrum: usually a strong, sharp transient knock at around 200Hz and then flat white noise up from there, which is the sizzle of the snare.
Kick drums
In DnB, kick drums usually centre around 100Hz. This gives loads of space for the sub bass to sit below it, so the two don't clash. This is not a strict rule, as every tune is different, but if you are looking to make space for your bass it is a good idea to try and get your kick to sit in the 100Hz range. You can achieve this with EQ or by pitching the sample. Both methods have advantages and disadvantages.
It's all physics! Or is it?
Knowing a bit about physics, frequency and engineering can be a great advantage when it comes to the technical aspects of music — although you have to remember that music is also a feeling, and sometimes big tunes are not technically what we would call perfect. This is the art of the process.
I think it is a good idea to have a rough idea of what frequencies elements in a mix occupy in order to be able to EQ them. An EQ will have no effect on an area of the spectrum that does not contain any content.
Dynamics and Compression in DnB
Is dynamics compression?
Essentially, the dynamics of a sound is how punchy it is. The dynamics of a whole tune is the difference between the loud parts and the quiet parts. In this section I am going to be dealing with the former: the punchiness of individual sounds or parts in a tune.
Firstly I am going to put this out there: I am not a fan of compressors. I don't really like the sound of them on many things, and when it comes to mixdowns I think they can add a layer of complication to the process that I am not a fan of. Some producers fall into the trap of using a compressor on every channel. It does look pretty, but it's about what it sounds like. Compressors on every channel can suck the life out of a mix.
If I wanted more punchy drums, I would be more inclined to use an envelope on the individual samples that make up the beat and then crush them with either clipping or overdrive.
Analogue compression is a thing
There are literally hundreds of software compressor and dynamics plugins. Some are better than others, but essentially they are all limited by the mathematics of digital audio. I am fortunate enough to have a couple of analogue compressors and they really are a thing — but it's an old sound. I could go into a rant about how old tunes sound better than new ones, but the reality of this game is you have to stay current to stay alive, so you have to work within the parameters available to you. The new DnB fans and listeners are used to the way it sounds now. I think there have been studies that say younger people prefer the sound of MP3 to WAV or vinyl.
Overdrive / saturation
Overdrive or saturation can be like compression: it starts to distort in a soft way as your level goes beyond a set level. This has a tendency to add harmonics to the sound, which in a digital situation is always problematic in terms of high frequencies given the nature of digital audio, but I have personally always preferred the sound of overdrive and saturation to the sound of compression / limiting.
Can dynamics be EQ?
I find the concept of dynamics in terms of the brightness of a sound to be an interesting way to think about the tone of a sound. When a drum hit, for instance, is very sharp and punchy, your ear is going to feel that it is brighter. This is what I mean by dynamics being a factor in terms of EQ.
Side chain and compressors
On most compressor plugins you will see an option for side chain. Sometimes this will be an internal side chain and sometimes an external side chain.
With internal side chain you will usually get the option for a high pass filter. This is not on the part of the sound that you can hear, but on the part of the compressor that triggers the gain reduction.
With external side chain you can trigger the gain reduction with an external source. This is used a lot in house music for that super pumping effect on samples. It is used quite a lot in DnB (not by me, cause I am mid AF), but I know a lot of others use it to make space for things in the mix, such as side-chaining the bass to the kick to give the kick space to breathe.
Personally I like to either have the kick and bass in different frequency ranges, or just let them battle it out and maybe get overdriven together. I'm old school, what do I know.
Want to know more about compressors? https://en.wikipedia.org/wiki/Dynamic_range_compression
What is Loudness?
What is a loud tune?
I think that loudness can be achieved with a combination of the correct EQ and clipping or limiting. Loudness is subjective, but there are things to keep in mind. Loudness is about balance — not too much of anything. Clipping or limiting, but no perceivable distortion. Mid range, but not so much it is overpowering.
The mid range thing is really key to loudness in my opinion. Imagine I was to whisper a word — it's all bass and treble. Then imagine me saying the same word out loud, with presence, like an announcement. It has very different effects on the ear. This is the effect of mid range on the perceived loudness of a sound. If you load up a sound as an experiment, chuck on an EQ with a parametric band at 1kHz with a wide Q setting, and start adding, you will see how much of a difference it makes when you turn it off and on again.
Then add some overdrive or clipping and you are well on your way to getting all the loudness you need. Remember it is all a balance, though: as you add mid range you are going to get to a point where it can sound crazy. I think you can always push mids more than you think is OK though.
If you reference released tunes you will hear that the loudest ones are very mid-rangey (is that a word?) to the ear.
Just slapping a hard limiter on the final mix is not going to make your mixdown loud. You have to combine it with good balance and you will be away!
Some science: https://en.wikipedia.org/wiki/Loudness
Sub Bass in DnB
Technique
There is a technique that has been used in DnB for the longest time, where we take out all the low information in any sounds apart from the kick with a high pass filter on all affected channels, and then replace it with a clean or semi-clean sine wave sub bass.
A clean sine sub bass in your tune will help it to be more defined and have clarity in the low end. It also makes the bass have the same level throughout, and it is not affected by phase issues.
Make room for the bass
With the kick drum in DnB, the fundamental frequency in particular is centred around 100Hz. You can achieve this with EQ, but also by pitching the kick drum in a sampler to move it up in range a bit. Having your kick up in the 100Hz range gives your tune plenty of space in the low end for that sub bass you just put in.
Remember that there are no hard and fast rules, and I have seen all kinds of tunes with lower kicks and slamming bass. Sometimes it just works and you should not fight that. There are also other techniques I have seen from neurofunk artists, with side chain on the sub to give room for the kick.
Structure of DnB Tunes
What is structure?
When I say structure, what I am talking about is the layout of the tune — the different sections and how they are laid out on your sequencer. In general a DnB tune is going to be made up of different sections. They will have different names depending on who you are talking to, but I will try and make it as clear as possible.
The structure of tracks is always evolving, particularly now in these times of digital DJ equipment making it much easier to beat-match records. The lengths of tunes are also getting much shorter. The average tune nowadays, like it or not, is between 2.5 and 3 minutes. For a producer of my age this is a shockingly short amount of time. Yes, I am now a grumpy old DJ.
I think knowing about the way tunes used to be structured can be valuable even in these times. So this is the basic structure of a tune from my era:
16-bar intro — 16-bar build — 32-bar drop — 32-bar B section — 32-bar breakdown — 32-bar second drop — 32-bar second-drop B section — outro (5–6 minutes at 174BPM)
Nowadays it is more like... (has to load up a bunch of new tunes into Ableton to see what the trends are):
32-bar intro/build — false drop / 16-bar build — 25-bar drop, then a mini 8-bar build — 25-bar second drop, mini 8-bar build, then — 32-bar outro (3:30 at 174BPM)
Essentially the way you structure your tune is very important to how it will be received by your fans and DJs. It has a massive impact on how it will perform in the market. I think it is really worth looking at the current trends and making choices on how you want to lay out your tunes for maximum impact and being as current as possible. It is definitely worth loading up a few tunes and seeing how they are structured in terms of bars.
Key
What key is my tune in, and does it matter?
Musical notes on the keyboard are named with letters: C, C#, D, D#, E, F, F#, G, G#, A, A#, B. The # symbol denotes sharp, and is a black note on the keyboard. There are 12 notes in an octave.
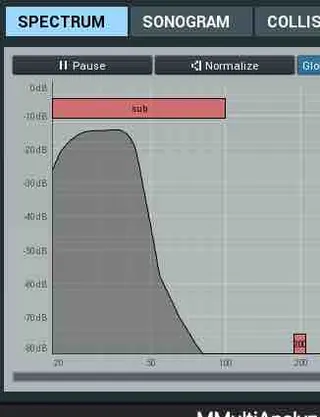
For the longest time I had no care or clue about the key of my DnB tunes. I just made tunes in whatever key it was happening in. As I became a more experienced DJ I realised that the keys of tunes do matter, for a number of reasons. A lot of my old tunes are in the key of C or C#. This means that the fundamental note in the bassline is low C. Low C, or MIDI note C1, is 32.7Hz — and a lot of sound systems in small clubs and bars are going to really struggle to play this frequency of sub bass. This is one reason why key really matters. I'm not saying you can't make tunes in low C, but it's going to take some clever production.
If you take anything away from this part, it is that some keys sound better on sound systems than others.
The fundamental frequencies of each key:
- C = 32.70Hz
- C# = 34.65Hz
- D = 36.71Hz
- D# = 38.89Hz
- E = 41.20Hz
- F = 43.65Hz
- F# = 46.25Hz
- G = 49.00Hz
- G# = 51.91Hz
- A = 55.00Hz
- A# = 58.27Hz
- B = 61.74Hz
At the other end of the scale, up in the A and B keys, things get problematic too. The nature of the higher bass can be interesting, but it's not going to rattle the room in the same way as the lower keys.
Popular keys
When I put a tune onto my DJ laptop I work out the key to guide me on what tunes it might potentially mix with. This is not always the case, as some tunes in completely different keys will mix really well — but that's for the DJ Academy. Anyway, the popular keys are:
- D, D#, E, F, F# — there are loads of tunes in F; I could name 20 off the top of my head
- G and G# have a lot of neurofunk tunes — don't know why, but they do
- C and C# are rarely used, but I have used them a few times
- A, A# and B have very few tunes. I know of a few (perhaps if asked I will look on my DJ laptop and show some examples)
DJs and pitch
Most DJs play at 180BPM, and most DnB is at 174 or thereabouts, so there is going to be a pitch change unless they press that little demonic time-pitch button next to the pitch slider that makes bass sound like poop. That is a whole different subject. But fundamentally there is going to be a rise in pitch. I was debating whether or not to work out exactly how much it is for a 6BPM change. OK, fuck it: around 0.6% per BPM change × 6... OK, my brain just shut off and I needed to have a cup of tea and a biscuit. But it's a bit anyway, and it definitely has an effect on the key of things.
In summary, the key of your tune really matters whether you know it or not, and knowing it is better than not knowing, in my opinion.
The End of a Tune Matters
The end, you say, TC?
When I am listening to a new tune from an unknown or new producer, a lot of times, after skipping to the drop, the first place I go to is the end. If I hear a good ending to a tune — something interesting or innovative — there is a good chance that the producer has taken a good amount of time to make sure the whole tune has had love, care and attention spent on it.
Never underestimate the power of a good ending to make you want to go back and listen to the tune again from the top.
Good endings include the classic hip hop delay/echo of a key element, or a totally different-feel ending — that's good too, to make you feel like there is going to be more interesting material from this artist in the future.
Fin.
Spectrum Analysis in Music Making
What is a spectrum analyser?
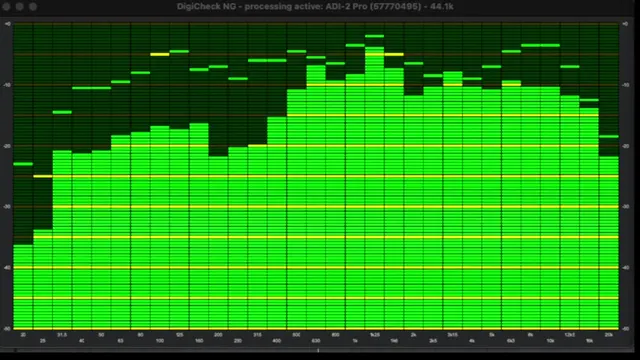
Essentially, to me, a spectrum analyser shows you what is going on in your tune in a visual way, in real time. Usually it will be set up to show from 20Hz to 20kHz (higher sample rates might go higher in frequency) on the left-to-right axis, and the gain in dB on the up-and-down axis.
Below is an example of DIGICheck NG in my setup (DIGICheck will only work with RME sound cards).
Setting up a spectrum analyser
I set up my analyser as fast as possible. I want to catch all the transients (sharp peaks) in the tune or track I am looking at. Usually I will have the floor at -60dB, but this is not a hard and fast rule.
Reading the graph
Learning to read the analyser is a big part of using it. I have DIGICheck and MiniMeters on all the time when I am listening to Spotify, watching YouTube, or checking out tunes people send me. I find a visual reference to be essential, as I can't always trust my ears. Depending on the daily air pressure, whether I have a cold, having been on an aircraft or spending time in loud environments, my ears are going to be unreliable — but I can always trust the analyser.
The way I learned to read analysis was to load up every tune I loved in a DAW project and just listen and watch the spectrum. I started to see all the elements pop out of the graph. You will notice that the sub bass on the left-hand side of the graph will be hitting the same area on the up-down axis on every tune that has been mastered. The top end, or high frequencies, will also hit the same levels, and so will the mid range. This will give you a rough guide to where your tunes should be hitting.
Links to analysers I use
- DIGICheck NG (free with RME sound cards): https://www.rme-audio.de/digicheck-ng.html
- MiniMeters ($10): https://minimeters.app/
- Melda MAnalyzer (free): https://www.meldaproduction.com/MAnalyzer
Not all analysers are built the same
Most DAWs will have analysis, and there are loads of plugins out there for spectrum analysis, but they are not all built the same. One thing I look for in an analyser is whether I can see the low peak of the snare every time it hits. Some seem to not show every peak, and that's an analyser I can't trust. Trying out many analysers to see which one is for you is the key — and also learning the one you use, like learning speakers.
Further reading: https://en.wikipedia.org/wiki/Spectrum_analyzer
Mix-Downs
What is a mixdown?
A mixdown is the final blend in volume of all the tracks in your tune, with some tweaks to EQ and placing things in the right space. With experience it will get easier, and the great thing is you have as many chances as you like to nail it.
A mate of mine was working with Skrillex on one of his albums, and he had a tune which was on version 53 or something like that. It gave me the inspiration that it is OK to have many, many versions of tunes, as long as you are working in the right direction.
A lot of people say they hate mixdowns. For me I think it's one of my favourite things to do on the journey to perfection. It means you are close to a finished tune — or at least one that you could play out as a dubplate, and that's got to be a good thing.
Don't overthink it. The magic is in the blend of all your ideas. If you have really good source sounds in your tune, your mixdown will be easy! I love to record my own sounds instead of using sample packs. They have a personal quality to them which is magical. I think people can really feel and hear when you are using original sounds.
Mixing as I go
I have been making tunes for 25 years, so I'm pretty sure of what I am doing while making a tune, and I tend to mix down the tune as I go. This is not always the case, and if you don't have a great deal of experience you might not know where things should sit in the mix. Having a good reference tune to A/B is a good idea to keep perspective on the balance of your mix — drum level, bass level and so on — and also just going with the feeling of the tune.
Most of the time I am just trying to make a tune playable in a set. Making it happen. I saw a really good bit of advice on this topic in a reel on Insta, where the guy said: imagine you have 2 hours before you have to play a DJ set to 10,000 people, and you need to finish the tune to play in the set. This will change your decision-making process when it comes to the mix stage.
Getting organised
Personally I find getting the project I am working on organised really helps me with mixdowns:
- Rename tracks (having your own naming conventions will help you find an element quickly)
- Colour tracks (sub bass is always red for me, drums always blue)
- Put the tracks in order (drums on top, next is bass, music, FX, vocals)
Does every track make sense?
I feel that every track in a mixdown should make sense in solo mode. There will be some tracks that are kind of supporting the sound of other tracks, and they might not have to make sense without the context of the related track, but in general, if every track makes sense, it will make for a much more coherent mix.
On the flip side, there are some multitracks of old rock where the stems sound terrible played individually but all just work in the context of the song. I feel this worked more in the days of tape recording, and even 32-bit DAWs and samplers. In the world of 64-bit DAWs and 32-bit floating point we are at a stage where everything is so clean that the individual parts need to make sense in solo mode.
Space
Reverb and delay are to music what light and lenses are to a film maker. A film with bad lighting and crappy lenses, no matter the quality of the writing or the star power of the actors, will not be the film it could be. It's the same for mixdowns: good choices of space for each sound in a mix are key to that glue people go on about.
Reverb is so strange. You can put reverb on a sound and have it so you can hardly hear the reverb at all, and then when all the tracks are running it can bring the whole thing to life.
Busses
Some producers like to have complex routing setups with multiple busses for drums, bass, music, FX and vocals. When it comes to bouncing out multiple stems this can have an advantage over just routing all tracks into a final master track, but I am not really a fan of too much bussing and side-chaining elements or tracks to other tracks.
I think it's really important to develop your own systems and methods for your production, and not fall into the trap of thinking that because you have seen or been told to do something a certain way, it is the right way. There are loads of producers on all kinds of platforms who have never had any kind of real musical success saying they know the way things should be done, and I would caution against being any more complicated than you need to be when it comes to mixdowns.
Clipping channels is not good
I would say that avoiding any red lights at the track stage will really help you to have a good mix. Clipping the master channel is fine (kinda) in my opinion, but clipping in plugins and on tracks has a bunch of issues (especially in Ableton Live). If you like the sound of the track that is clipping, put a clipping plugin on it and turn it down.
Testing
I think it always takes a few goes to nail a mix. Testing on multiple sound systems is a great help in feeling it out. Some places I recommend listening to your mixdown:
- On your phone speaker (a lot of people will use this as their primary way of consuming your music)
- On EarPods / headphones
- In the car (you're in the driving zone, so you will hear it in a different way)
- With producer friends (you will hear it as if for the first time again, through their ears)
The writing phase might not be over
If you are having problems mixing down your tune, it might be that the writing phase is just not over yet. Maybe you need to roll back and add more elements, change some stuff, move things around a bit. There is a 3D video maker I am very inspired by called Ian Hubert, who did this talk on world building. When people ask him how he makes amazing videos, he says: "Don't get to the point where you think it's done yet." This is massive for me, and links back to Skrillex having 53 versions of a tune. I get sent so many half-done tunes, and I can hear that they just needed another 3 weeks' work.
Mastering
This could be a page in itself, but here we go...
History of mastering
As far as I understand it, mastering was the process of taking an audio source or format and converting it to another format — from master tape to vinyl, for example. The purpose of mastering was to make the format change with the best level and EQ to match the format's capabilities.
I think it is good to know the history of mastering to understand the fundamental job at hand. Instead of going from tape to vinyl like back in the day, we are going from a digital pre-master to a digital master file.
My history with mastering
In the early days of my DnB journey, vinyl was still the only format that mattered when it came to releasing records, so you would have to use a mastering service. It made a big difference who mastered your record in terms of the quality of the final product. Where possible I would cut with Stuart Hawkes (Stu) at Metropolis Mastering. I would always try to attend cutting sessions to get the best possible outcome for my records. I am fairly superstitious, and I felt it would somehow endow my record with some kind of good energy if I attended. It was mind-blowing to go to the mastering room and see all the equipment and the massive PMC monitors. Hearing your record in that environment was really interesting.
Vinyl mastering, and why it could still matter
Here is where we start to step into the technical aspects of the mastering process. As far as I understand it, there are limitations on what you can cut to vinyl in terms of frequency content.
Starting with the high end, there is a limit to how bright you can cut to vinyl, especially above 10kHz. The physical width of a Stanton cartridge's stylus effectively limits it to around 14kHz, giving it a hard physical filter above that frequency. The cutting heads on a Neumann lathe have limits, and the energy involved in cutting high end to vinyl creates a lot of heat. I believe the cutting heads have a limited lifetime and can blow or break if they are not cooled.
At the low end, as I understand it, there are limitations on how much stereo information you can cut to vinyl. What I was always told is that anything below 300Hz has to be in mono, and there can't be any low end anti-phase.
Understanding the physical limitations of a particular media or format is key to understanding the task of mastering. I am not saying you have to master as if you are cutting to vinyl in these times, but it does help to root your thinking in reality.
Where are we going? Balance and level
The next stage of learning how to master your own material — even if it is just for DJs to play out, and you get the final product mastered by a professional — is to know how loud to take it, and how it should be balanced in terms of the relationship between low end, mid range and top end to compete in the genre you are making.
To do this you are going to need:
- A lot of tunes that you like and would like your master to match
- A metering tool for level measurement with an RMS scale
- A spectrum analyser
For more advanced mastering you will need:
- An acoustically treated room
- Good digital-to-analogue converters
- Good speakers
It is time to learn your setup. Listen to all the tunes you like on your setup and look at the metering and analyser to see where they hit in terms of level and balance. Making notes of the levels for each measurement tool is a good idea. After you have done all this, you will have a reference point from which to start mastering your own material.
Master chains
The simplest master chain is simply to clip the output of your DAW. I know a lot of producers do this for DJ masters, and it really is one of the most effective ways of achieving level with the least artefacts.
More advanced chains would include: a good linear phase EQ — compression (less is more) — a limiter (FabFilter Pro-L or equivalent) — clipping (KClip or equivalent).
The better you manage to get the mix, the less you should have to fix in mastering.
Mid/side processing
Some plugins let you split the mono and stereo information and treat them separately. For example, I might use a high pass filter in FabFilter Pro-Q 2 and set it to high pass just the stereo information, cutting stereo from the low end below 300Hz. This is not for cutting to vinyl, but to get a more solid low end.
There are more mid/side tricks I am aware of, but they are not really anything I would mess with. I think it's best to get things perfect at the mix stage and have the mastering be more about level and slight balance changes.
The chain continues past the WAV
It is wise to think beyond the master chain. After you bounce that master file there is a good chance you are going to convert it to MP3 to send to DJs, and even this process can require some headroom. Andrew Scheps says he thinks a -0.6dB limit on the master file gives the MP3 converter enough headroom to do its thing.
When the DJ is playing the tune in the dance, it is going through the following chain:
CDJ D/A converters > Pioneer mixer > DI box > front of house mixer > some crappy old Behringer compressor in small clubs for speaker protection > crossover unit > amps > speaker cables > speakers > the air (this is a thing — a full, hot, sweaty club is going to sound very different to an empty cold one) > into ears
That's a hell of a lot of things before you get into the brain of your listener. Worth keeping in mind, or just being aware of.
Separate mastering projects
Some people like to separate the mastering process into a separate DAW project. I think there are advantages and disadvantages to this approach. It can give you a bit more processor power to use higher grades of oversampling in the plugins on your master chain, which can give you a little more clarity and less distortion — but we are moving into a time where processors are insane, and I don't think it will be a limiting factor for very much longer.
I think that in this day and age the levels are so insane in DnB that you have to be doing mixdowns and tune making into your master chain, to make sure you are not making mistakes.
Professional mastering
Having tracks mastered by a professional can be very satisfying and can give you closure on a project you have been working on for a long time. There is a big advantage to having a new pair of ears on your music, especially from a pro with many years of experience in mastering. Some of the records mastered by Stu are my most successful, and I think having his ears and experience be part of the record really made a difference — but the cost is not insignificant.
Levels
The levels in modern DnB are actually insane. I have seen records that are clipping RMS and still sound clean and not distorted. This is some voodoo shit! I think it is best to aim for a good level.
Best practice for delivery to mastering
If I was going to engage the services of a mastering engineer, I would deliver the following files:
- A description of what I want to achieve, either in the correspondence or as a text file
- A self-mastered reference file (24-bit 44.1k WAV), so the mastering engineer can hear what you want to achieve
- A pre-master with no master chain on the final output channel of the DAW (24-bit 44.1k WAV, or the highest sample rate and bit depth available from the DAW's output)
Paid mastering services for DnB
Here are some people I recommend for mastering DnB.
For vinyl: Stu @ Metropolis
Digital:
- TC — see Mastering, or email dontplayrecords@gmail.com
- Nu:Tone (very conservative masters, but very good!): https://www.ntmastering.com/
- Break (not sure how to contact Break about his mastering, but he is a don)
- TeeBee (again, it's not clear how to get him to master for you, but his masters are amazing!)
- Joker
There are no rules
As with everything in music, there are no rules, and things are always changing and evolving — and what a beautiful thing that is. But it also means you can't just say "add this here and do this there" to explain how to master a record. It's about learning what needs to be done and doing it right. You don't need crazy money, and you don't need to do things in any particular way. I have heard what I would say are not the best masters do really well in DnB, and other tunes that sound spectacular just don't connect with people. It's so subjective.
Frequency charts
I was looking around for a frequency chart or EQ chart to give you a visual reference, but the truth is there is no chart I could find or make that would be right all the time, cause music just ain't like that. You have to feel it.
Online and AI mastering services
Personally I would steer clear of any online/AI mastering services. I have not used them, but there is no way you can beat a human at this in the current time. Mastering engineers have many tricks and secret sauce that would be very hard to recreate with an AI or an algorithm.
The 1dB bump
Some mastering engineers will use the following trick: on the drop of a tune they will bump the volume by 1dB (one decibel). This gives quite a significant boost to the perceived impact of the drop. Alternatively you can reduce the volume of the intro by 1dB. This can be done pre or post mastering, or by automation on the clipping plugin. Sometimes even 2dB can work, but I have found it is a lot more intrusive. Also, if there are breakdowns and builds throughout the tune, they have to be taken into consideration when using this technique.
Your ears are relative measurement tools. This is why a bump in volume, even 1dB, is perceived as being better.
I remember a story that Stu from Metropolis told me back in the day. He was talking about how he and the team were testing out new AD/DA converters, trying out all the different models. One of the converters stood out by a mile to everyone. They were blown away by this particular model, and everyone was very excited about this new bit of kit. When they came to hook it up to calibrated measurement gear, it turned out that this particular unit was out of calibration by half a dB+. To the finely honed ears of all the mastering engineers, this was enough to fool them into thinking there was a new game in town.
Vocal Chains
What is a vocal chain?
A vocal chain is all the steps, equipment and plugins involved in making a great vocal. A really great vocal sound and performance can be the difference between your tune being what you want it to be and it not quite hitting the mark.
Writing
There is nothing more frustrating than having to come up with words and lyrics on the fly in a recording session. It is a good idea to make sure that the song is written before you enter the recording phase.
Start with the recording space
A great acoustic environment is almost more crucial to an incredible-sounding vocal than any other part of the chain. You could take a £20k mic and preamp combo, put them in a terrible room, and get a really bad-sounding vocal. Alternatively you could get a cheaper mic and preamp combo and have an incredible-sounding vocal. A good recording environment does not have to be expensive. I have heard stories of artists needing to get a vocal completed for an album project while still on tour, and using the closet with all the bed sheets and duvets stacked inside, with the mattress behind them, to get the right acoustics. If it sounds right, it does not have to be pretty or impressive. In this day and age of social media, it might even be a good part of your story as an artist to show your janky vocal recording setup.
The deader the better — meaning the fewest reflections and the least reverb in the recording environment will give you the best results. You can always add the space with reverb later.
A good performance
Whether you are the one performing and recording yourself or you are recording a singer, getting the right performance can be a challenge. When recording a singer it is a good idea to record every performance. Record everything, whether it's wrong or right — get it all down. You never know when, in post production, you might need a slightly different performance of a word or phrase.
Whether the performance is going well or not so well, positive encouragement is essential to keep the energy in the room. Singers need to be in a good mood and loving what they are doing. Even if it's a sad song, we are keeping the energy positive.
Technical information
The simplest chain you want when you are recording vocals is:
- Recording gear: good room > mic > preamp > audio interface (the more expensive the better, but not essential)
- Plugins on the vocal channel: de-esser > EQ > compressor > limiter > chorus (subtle) > reverb
What is a de-esser?
Words that contain the letter S add a lot of very loud SSSS to the top end of a vocal. If you want to turn up the top end with an EQ to get a brighter, more airy vocal, you are going to have to deal with the esses. Some producers go through an entire vocal and turn down every ess individually, and some use a de-esser.
EQ
I like to roll off the low end with a high pass and add some air in the top end. With the right setup you are not going to have to do a whole lot in post production if you have nailed the room and the mic setup. Way better to get that right before you hit the DAW.
Chorus
For that massive classic vocal sound you are going to need a tiny bit of chorus effect. The pros use the Eventide on the micro pitch shift setting. I don't wanna give it all away, but this is a thing and there is a plugin.
Reverb
I like really good reverb on a vocal that you can't hear in the mix — only in solo, and even then it's low in the balance. When you listen to classic acapellas of massive tunes you love, you are going to hear a subtle reverb. Even vocals you thought sounded dry in the mix have a bit of it.
Recording distance
The distance you or a singer sings from the microphone can make a massive difference to the sound of the vocal and the EQ required in post production to achieve the right balance for the tune you are working on.
Closer to the mic is going to give you that pop music close vocal sound, but you are going to need a pop shield to protect your mic and filter out the plosives. Words which start with the letter B or P, for example, emit a pop of air that can overwhelm mics and cause a pop or low end bump that will be very obvious on a recording and very hard to get rid of in post production. Plosives become less of an issue when you move further back from the mic, but the sound of the room becomes more obvious.
Takes
I would recommend at least 8 takes of each phrase as a starting point for recording a vocal performance. By the 8th time round a singer will have it in the pocket.
Waves R-Vox is a thing
Not a massive fan of Waves as a company, but R-Vox is a thing you can't ignore when it comes to vocal processing.
Submitting Music to Labels and DJs
Formats
When sending out tunes to DJs and labels, I recommend you send 320 MP3 files, not WAV files. Yes, there is a very slight difference in quality, but the less friction to hear the music the better. DJs and label executives are very busy and always on the go. If you send your pristine 24/96k WAV it is going to be 90MB, as opposed to the 9MB of an MP3, and depending on hard drive space and internet bandwidth, the time it takes to download and get to their ears could be the difference between them hearing your masterpiece or giving up and moving on to the artist that sent MP3s. They will request WAV files if they need to hear or play out a better quality version.
Beware: some unscrupulous labels might release your music without a contract or permission. Sending MP3s offers you a little protection against this, as they are not release quality — although I know of tunes that have been released in the past from the MP3 version without the producer's permission.
Delivery
The service you use to send your demos matters. I would say SoundCloud and Dropbox are acceptable, WeTransfer is OK but not recommended, and any other untrusted file sharing network is not recommended.
Number of tunes
Just send your best 3 tunes, that's it. Don't send the 30 tunes you have in the folder of finished ideas. Don't cold-send demo material or unfinished tunes — that is for your friends, unless you have a relationship with the DJ or label. DJs don't want your half-finished tunes.
Best practice:
- 320 MP3s only
- Be polite and respectful
- No more than 3 tunes for first contact
- SoundCloud (with downloads active) or Dropbox links (no funny-looking file sharing)
Bootlegs, Self Releasing and Dubplates
Bootlegs
A bootleg in drum and bass is an unofficial remix of another tune. In DnB there is a very clear distinction between bootlegging another DnB tune and bootlegging a tune from another genre. If you remix another DnB artist's tune, I feel you should show respect and not hand it out to other DJs or put it out as a free download to collect emails. Send it to the person who made the original and at least give them the option to release it. As for bootlegs of other genres, it is fair game to use them as you wish. In drum and bass there is a long history of bootlegs, and long may it continue.
Self releasing
If you have a load of momentum, and everyone is after you to book you and loves your tunes, you might as well start your own label and get a distribution deal with a company like Cygnus Music. This way you will get 100% of the profits from the recordings you release. Unless a record label can offer you advances, promotion or marketing leverage, there really is no reason to sign a record deal with anyone.
Dubplates
A dubplate used to be the name of a one-off record that DJs would use to test out new tunes in the raves before they were released. Nowadays, in the new world of the digital DJ, it means an unreleased tune.
Dubplates are a huge part of the scene. Having a bunch of unreleased tunes that everyone wants can get you a lot of bookings to DJ, and give you leverage when trying to get other unreleased tunes from other artists.
Build a stack of dubs, even if it's just for you to play out.
Data Management and Making Music
Folder structures
There are a few ways you can organise your files for music making. I have never found a system that is perfect, but I am fairly happy with the system I have. I have a folder for music; within that folder is the year, and within that the months, with month number and name, as in "01 Jan 2024". I started doing this in 2004, and now I have 20 years of music and ideas. Everything I do in terms of music goes into this structure, with small exceptions:
Music — Year — Month — Project name
Should you have a database for your projects and releases?
An Excel spreadsheet for your projects and releases is a great idea. It will help you keep track of all your projects, ideas and releases. There are so many little bits of information you need to keep track of as a music producer. Every big project always has a database!
Checklists
When you put your life in the hands of a pilot on a flight, they are using a checklist through every stage of the flight. There is no shame in the aviation world in using checklists. Even when you are a very experienced pilot or producer, there is a tendency to miss small steps in the process that could be crucial to the flow of a release (or a flight).
Stems
I think when you put a track together for release you should always stem it out. 10 years down the road you are going to thank me, when the DAW you used to make the tune is no longer supported or your files get corrupted. The stems will live on much longer than a project file. The same goes for MIDI files of the more complex musical passages.
Backups!
Data does not exist unless it is in 3 places!
Data does not exist unless it is in 3 places!
Data does not exist unless it is in 3 places!
There is nothing worse than losing your hard work. I would recommend buying 3 hard drives (same model, same make, same size) whenever you think of buying one. This will cover you when, inevitably, one of them dies or a drive's power supply fails. Be very careful when handling them — they are delicate and need to be handled with care.
Operational Security (OPSEC)
Keeping online accounts secure
As an artist you are going to have multiple online accounts. I know of many artists who have been hacked and lost money and momentum through the process of having to sort it all out. It is way better to have your system set up early, so you never have to go through the headache of dealing with hackers. There are some key concepts to keep in mind to stay safe and secure online:
- Use strong passwords: random letters (upper and lower case), numbers and symbols
- Use long passwords: as long as the account will let you, within reason
- Use 2FA (two-factor authentication) wherever possible
- Never use the same password across multiple accounts
There are multiple systems out there for password management. Personally I recommend NOT using a password manager that is built into your operating system or phone.
The unfortunate reality in this time is that there are some bad people out there who would like to take the leverage you have worked to build, or to hold you back. Keeping your online accounts secure from the start will make it much harder for anyone to disrupt your plans.
Beware the defensive hire
If you are a young artist with a lot of momentum and reach, a label offering you a record deal might not be on your side. There is a fine line between being over-paranoid and being realistic, but knowing that in the past people and labels have been known to sign artists to slow their progress is worth keeping in mind. Most people and labels have good intentions, but be aware that if someone could control their competition with a hire, it might be tempting.
Contracts (this is not legal advice)
If a contract contains the word "perpetuity", it means forever and always. This is not standard in a music contract (this is not legal advice). Usually a contract will have a term — the length of time the label is allowed to exploit your music.
Mostly contracts never have to be enforced and are meaningless; it costs a lot of money to take someone to court, and good legal advice is expensive. That being said, it is still a good idea to have a contract with a label if they are putting out your music, as it lays out the terms in a way that you and the label know your respective responsibilities.
Music is war
I wish it was all peace and love, I really do. But the very sad reality of humanity is that it's not all love. There are bad people out there, and you have to know that you are going to get ripped off a couple of times in music.
Tax
If you start making money from music, whether from royalties or playing live, you are going to have to declare it with HMRC, or the relevant tax authority wherever you live. I am no expert in this subject, but getting your act together in terms of tax is very important. You really don't want to get down the road and end up with a crazy tax bill.
Suggestions and Changes
This is a list of suggestions and changes to this page that I am going to work on from time to time. If you have any suggestions or changes, please hit me up at dontplayrecords@gmail.com or join the Discord.
Basics:
- Goosebumps — when you get them, don't forget it, and don't listen to the tune too many times
- Recording your own stuff! Drums, bass, FX, vocals (is that where the magic happens?)
- Making music is LONG
- Why is my music not as good as others'? All music is subjective
- Having an effect in the dance (why testing tunes in a club to an audience is necessary)
- Kick and sub bass relationship
- Mastering: advanced technical levels and current trends / level metering tools
- Filters, and why they are a foundation of the DnB sound
- Why do I need studio monitors? How do I learn them?
- Use of automation to create movement in your tune
- Sampling
- Useful resources list: YouTube / reading
- PRS / MCPS — register your music with the collection agencies
Advanced:
- Vocal tuning
- Recording techniques
- Acoustic treatment
Amendments:
- Mixdowns — recording drums is a mixdown before you even get to the mic. Back in the day producers had very few channels and no effects, so balance was everything
As with everything on my website, this is a constant work in progress. If there are any questions or topics you think I should cover, please feel free to dash me an email at dontplayrecords@gmail.com, or join the Discord and ask me on the-wolfpack — I check in there daily.
Get new Academy chapters by email
New dubs, packs and gig dates, straight to your inbox. No spam, unsubscribe any time.